


Laser printers are powerful devices that use a complex printing process to deliver high page yields with high-volume printing over an extended period of time. In comparison to inkjet printers, laser printers are more powerful, more durable and have lower costs per page and a longer shelf life.
Laser printing carries out a series of ultra quick, and yet a complex process! The primary principle at work in a laser printer is static electricity. Static electricity is basically an electrical charge built up on an insulated object. Since oppositely charged atoms are attracted to each other, objects with opposite static electricity fields “cling” together. A laser printer uses this phenomenon as a kind of “temporary glue.” The core component of this system is the photoreceptor, typically a revolving drum or cylinder. This drum unit is made out of highly photoconductive material that is discharged by light photons.
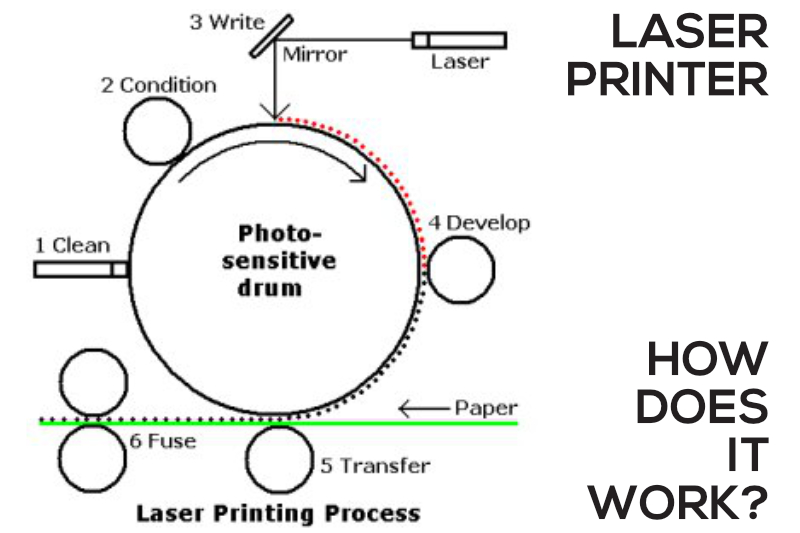
6 steps of laser printing process:
Every time the moment you click “Print”, your computer starts sending a set of directives to your printer to commence the printing process of your document. Refer to the above diagram for ease of understanding.
1. Cleaning:
Firstly, the printer cleans and removes any residual toner from the drum from previous print job via a physical and electrical process. Excess remnants of laser toner on the drum are scraped away by a rubber-cleaning blade into a debris cavity, and are defused by electrostatic erase lamps.
2. Conditioning:
An electrostatic negative charge is then applied on the surface of the photosensitive drum. This to remove the old latent image (an image on an exposed film or print that has not yet been made visible by developing) from the drum and conditioning the drum for a new latent image. A negative charge is also applied to the paper as it is drawn from the paper tray passing though the corona wire or transfer roller. By applying the negative charge to the paper is to prepare and allows an image to be electrostatically transferred at step 5.
3. Writing:
At the exact same time the laser from the laser diode sends a laser to the moving mirror which moves to “draw” the image onto the photosensitive drum. Eventually an entire image of what you asked for it to print will appear on the drum as it turns.
4. Developing:
An ink roller then applies the photosensitive drum with very fine particles of negatively charged plastic and carbon, or also what we referred to as the toner powder. The toner powder then moves from the control blade to the more positively-charged latent image on the drum.
5. Transferring:
When the paper moves near the drum, the corona wire applies a positive charge to the paper and the toner that is attached to the latent image is transferred onto the paper. The negatively-charged toner on the drum is attracted to the now positively-charged paper. The toner is now resting lightly on the paper and is held in place by the positive charge.
6. Fusing:
The paper then passes through the fuser, which is essentially comprised of a hot roller and a pressure roller that puts heat and pressure onto the toner which is melted and then pressed into the fibers of the paper.
And finally, the paper then emerges out of the output tray of the printer, and it is still hot from the fuser.
That is the complex process of the laser printer. Now you know how the laser printer works!


