CARTRIDGE CARE
Tips for laser toner cartridge care:
- Keep your toner cartridges horizontal, NOT vertical.
- Always store laser toner cartridges at room temperature (less than 35 and above 10 degrees celsius), and away from places with excessive humidity.
- Never expose laser toner cartridges to direct sunlight, as some parts in the cartridges are photosensitive.
- Keep your toner cartridge in its original sealed bag until it is to be installed into a printer. Use cartridge within 1 year of purchase.
- Remove the sealing tape and/or protective paper (if there is one) prior to installation in your printer.
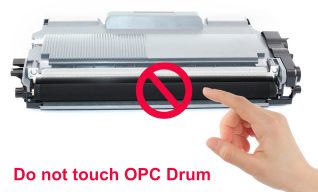
- Hold the cartridge handle or the outer shell at all times. Avoid touching other components:
- The chip (the part that connects to your printer).
- Primary Charge Roller/Developer roller (a rubber roller that comes in contact with the Organic Photo Conductor/OPC drum).

INSTALLATION GUIDE
A general guide on how to install your laser toner cartridge:
If you replace your toner cartridges regularly (genuine or compatible), and they have been working just fine, that means you are most likely doing the right thing. Otherwise, refer to the general guide below on how to install your laser toner cartridge.
Please note, this is a general guide ONLY. Always refer to your printer operating manual if you are in doubt.
- Turn your printer off and open the printer door cover. Different printers have different door cover opening mechanisms. Refer to your printers operating manual if you are unsure how about this.
- Once the printer door is open, carefully remove the used toner cartridge from printer and gently place on a bench.
- Keep the drum unit inside the printer, away from any light source as much as possible as it is photosensitive.
- Before opening plastic housing packaging with new toner cartridge, double check to ensure you have the correct compatible cartridge by checking the model information on the outside of the new printer cartridge box.

- Step 1: Remove the new toner cartridge from the packaging.
- Step 2: Gently shake it horizontally from side to side for 20 seconds to help evenly distribute the toner powder inside the cartridge.
- Step 3: Pull out the sealing tape*
- Step 4: Remove the protective paper*
- Step 5: Remove the protective cap.
- Step 6: Insert the toner cartridge into the printer until it clicks into place. Close the printer cover/door and switch on the printer. Once again, refer to your printer operating manual if you are unsure about this.
*IMPORTANT NOTE: Examine toner cartridge to see if there is a plastic sealing tape protruding from the cartridge, as often the tag is transparent. It depends on the model of toner cartridge, some WILL have a sealing tape and/or a protective paper, while others WILL NOT. If your cartridge has a sealing tape and/or a protective paper, then remove completely as above and then immediately fit to printer. The removal of this tape and paper is extremely important as it allows the toner to drop into the hopper assembly. Failure to remove completely may result in blank prints.


